Tuesday, December 27, 2022

2014 Tesla Model S Next-Gen Seat Swap - A Parallel Project

In addition to bicycles, I have had a long-term interest in cars and even making mods to them. Its been a long time since I last worked on a car or had a car project,  OR desire to do so. 

Once you go Porsche 911 (1986 Carrera here), all cars after are just not worth the love. The GTI Autobahn came perfect from the shop new, nothing to add, the seats even perfect. Like the 911, I finally sold it after the kids had no desire for it, my excuse/regret was the lovely Recaro heated seats. BUT I did it, I moved on, with the mission of getting Recaros into my old Tesla Model S. 

(Yes, I am a blessed old white man, don't worry my time is short and meaningless as a Gen Xer)

So years after only working on bicycles, I had a car project.

After researching the options, it turns out Tesla actually had a $6000 after sale option providing seat upgrades to the 2014 Model S. These 2015-2016 "Gen 2" or "Next Gen" seats were actually MADE by Recaro for some time, and the design used by later Tesla suppliers. So how do we find these seats in 2022?

Ebay searching for most of 2022 and Craigslist produced few options to match my Tan interior - black would/could maybe work and were far more plentiful. In addition to seats themselves, 4 special adapter wires were needed to manage the 28 wires that needed mapping from the new seats to the older cars.

A search on Co-Part turned up a set of seats not posted on Ebay by "Calimotive Auto Recycling" in Rancho Cordoba California.  A month's long back and forth text chain with a Daniel S. at Calimotive ensued. He only wanted $600 for these:


I still needed the harnesses adapters. The main forum on the topic included someone doing the swap WITHOUT the harnesses, but cooler heads prevailed within and documented the needed pieces to make this plug and play.


2x ASY, JUMPER, SIAB-SEAL TO UNSEAL, MDLS? (1116327-00-A)
1x MS SEAT HRN PATCH NONMEM- SEAL TO UNSEAL (1139367-00-A)
1x MS SEAT HRN PATCH MEMORY-SEAL TO UNSEAL (1139366-00-A)


Tesla Service center sort of responded, getting me an invoice but cancelling and rescheduling me over November as parts did not show up. SO I started back on ebay for the the harnesses, and got 3 of the 4 required, Tesla came through with the last in December!


Even though I am in the SF Bay Area, I still needed to actually get to Calimotive, requiring a good chunk of a day. With limited PTO and Calimotive M-F, the magic day was December 23, 2022. 

My elder son and I made a day of it, picked up the seats for a very good $, got a tour, 


ate a lunch

and got those seats home! Plenty of space in the back of the Model S for these


Boxing Day became the swap day for the Driver seat, high risk as we plan to use the car for the annual run to Bear Valley snows

Removing the 12 volt battery connector required lots of disassembly and re-assembly. Really necessary?

Got the old seat out...

Got the new harness plugged in to connect the seats
And the "new" Next Gen Seat in!


The result so far is FANTASTIC. The seat works, even the heater, and it fits my body so much better. I am old but not fat enough for the Gen 1 as I suspected. 

With this project finished, I am able to finally let the GTI go as my butt is now satisfied ;)


Maintenance Roundup End of 2022

Taking Santa Creme out of commission for the rainy season led to work and use of the other bikes of the fleet.

The Meta HT 29er got to wear the big MudHugger front fender - I could not find a good way to mount he rear without damage so left it off. I still have the front wheel and TIRE, a Nobby Nic, of Ernst, and its working really well - not quite a Minion, but good. I am also riding the Intense Saddle and rear wheel here, with those big bars, just a good solid pedaling platform.

TODO/NEXT: 

  • Needs a new crank, only 3 of 4 bolts in the 175mm 11sp XT


Scout 290. The neighbors took a pass, but I was not too sad. Comment was made about rattling in the rear cassette, and they had a point - the cassette rings had dug into the aluminum freebody carrier. 

The solution? A new DT Swiss Freehub body. After I ordered the Wrong one from Amazon, I ordered the proper part successfully from Worldwide Cyclery.

DT Swiss 3-Pawl Freehub Body - Shimano HG 11 MTN, Standard, Steel, Sealed Bearing, No End Cap

The fix worked GREAT, I started riding the Scout290 a bit, and got into the shorter handlebars - 750-760mm, lots more room at China Camp skinny trails BUT also many more pedal strikes with the added space!

TODO/NEXT: 

  • Nothing, the bike is a hoot as it is. 
  • Maybe move the crank to the Meta and get shorter crank arms to match the shorter bars.

Squirt Lube. My pro-crush on JN continues and so I decided to try his lube. Seems to be working across the fleet so far, holds up well in the wet and has not failed in dust as there has been no dust in December ;)


Santa Creme Suspension Work and Front-End Upgrades for 2023!

Despite the good work debugging Santa Creme, I took off the suspension and gave it to JN to ship and overhauled by his Santa Barbara mechanic. Psyched to get this done and to participate with pro JN maintenance cycle!


Apparently, dirt was the culprit. I sent along the 140mm spare shaft and wiper kit. Shaft came back, maybe they used my wipers


JN as the intermediary

"He said that the fork was really dirty inside which probably was causing the issues that you were experiencing. So no new air shaft needed."
Also he confirmed that all pikes use the same CSU regardless of travel, so the fork is good even though it’s marked 120 on a 150 travel fork."
The invoice sheds light on the work performed:


Items                                                             Quantity                        Price Amount
Full Service Fork                                                     1                            $130.00 $130.00
Rockshox Charger 2/2.1 Damper Service Kit                 1                           $22.00                                                    $22.00
Rockshox 35 DebonAir & Solo Air Service Kit                 1                        $12.00 $12.00
Full Service Shock                                                     1                            $140.00 $140.00
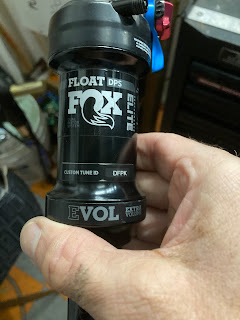
Fox CTD and DPS service kit                                         1                             $20.00 $20.00
Fox Rear Shock Air Sleeve kit                                         1                             $24.00 $24.00
Fox Eyelet Bushing Flanged                                             4                             $0.50 $2.00
Fox DPS Shaft                                                                 1                            $15.00 $15.00

Total (of "Amount" column)     $365
Plus $22 shipping
Grand Total = $387

JN delivered the parts yesterday, just before the rains. They look GORGEOUS, brand new, I look forward to putting it together.

In addition to suspension work, Santa Claus hooked me up with further upgrades for Santa Creme ove the month of December

New DHF Minion, 2.5! 


The current front DHF will goto the rear, destroying any last XC remnants of "project lightening" here.

And, yet another Nuke Proof Dropper - I dumped no less than 4 empty Nukeproof bar boxes this weekend.


Santa Creme only has had the medium drop option.

Nice rain going on, I will get into it soon with final pictures.

And some pictures assembled

the tag "Lone Wolf Suspension" had the settings before and presumably after the maintenance - not anything magical


Brakes and fender on

New air cap and Fun Meter!


  • TODO:
    • new 25mm of brake-bolts required -current one was rusty
    • the ratchet in the 12sp XT shifter seems to be shot - the lever is not ratcheting, instead going flat to the max/not moving to the next gear
    • bad or broken cable? but its new...


Monday, November 7, 2022

Santa Creme Rear Shock Rattle and Fix

Santa Creme has had a nasty rattle the last few months. I suspected the main link, took it out/lubed to no avail. A slight click/gap when lifting the rear.
So then maybe the shock? Its never had maintenance, the only change was flipping the chip. So I deflated it, and began to take it out. Front bolt popped right out, but the rear was very stubborn. Wha?
Rubber mallet escalated to wood and real hammer. And a slip plus chip to the white creme frame. 


No more white bikes.
I measured the diameter of the mount bolts, front was 0.795, rear 0.805. Hmm.  So I sought OEM bolts for my frame but only found Titanium upgrades. Oooh! Oilslick!
https://betterbolts.com/
Mount bolts plus some link bolts were part of the package for $46 ship + tax.
So I learned of the hardware and processes used to put the shock on the bike, its generally called "shock mounting hardware". This video by the Lost.co was very useful
https://www.youtube.com/watch?v=9ScLQgoNgxU&t=928s
I ordered parts, a 22.2mm width was closest to my 22.0 requirement, THEN found the "lead buried" in the very end - go SMALL. So returned the 22.2 and got the proper 21.8 for my 2018 Santa Cruz Hightower V1 frame.


Another $22.
Re-assembly was easy. Along the way I compared weight of the Ti bolt vs the OEM steel - 8g lighter each.


I put all the Ti hardware on, plus the Better Bolts Sticker, put air in the shock, and the rattle is gone. I have yet to ride it, but will declare victory.

Next project on deck is fork service. And now shock service.

Pondering a selloff of this and the Intense XC for a Yeti SB130...stay tuned...

Sunday, October 2, 2022

2022 Unfondo Overhauling of White Lines


After I was promoted from the wait list into the 100 chosen for the 2022 BBC Unfondo Ride, it became necessary to practice road riding. In the process, its clear there has been some deferred maintenance going on with the primary road bike of the fleet, my Ridley Fenix Disc, nicknamed White Lines.

The efforts worked, White Lines survived the ride but some final tweaks went in even today (see bottom of list)


New Bell!

Given how much I enjoy and use the bells on the mountain bikes, I decided it was time to get one for the road bike. Installation was a bit tricky, I settled on an aero position that seems really loud, at least for me.

The bell, with Coospo Computer on White Lines


Front Derailleur Tune Up & Discovery

The lesson here is to RFTM - I watched You Tube video to discover an entirely new adjustment bolt I did not know existed on the Ultegra 8100.


The video warns of deltas from the 10 speed fronts and high tension required - I wish I had this 5 or 6 years ago when I installed this.


Tires - Finally Installed

I bought the Conti 5000 Whitewalls from Vlad, but they really are Tan-Walls. I used one on the front of the Solo Velo, but decided it was time to get them onto the intended target, White Lines. See the theme?

White Wall Tires That Are Tan


Anyway, slight disaster using an old leaky tube last week, the tires worked great this week and for the Unfondo itself yesterday.


Big Mouth Bike Rack Install on Tesla

Finally put the Mom n Dad Racks to use. Scheduled to take a 3rd in our carpool, I needed
another rail. It took a lot of work dealing with the T-Bolt install and it was hard to center and reach the middle position, but it worked. And didn't get used.

Racked Up, Backwards


Hint when using T-Bolts - just detach them from the levers, THEN put them into the rail.


Dura Ace 9100 11sp Rear Derailler, New Cable

This is the second time the Ultegra 11sp rear derailleur has been a problem - earlier I blew this unit up running a too short chain and then crossing it, while hammering up a hill. I got replacement cages and pulleys via Ebay


and it seemed good, but during front tuning, I noticed a popping effect as the lower pulley seemed to over-grip the chain. The cage is supposed to be slightly twisted, but more was going on here:

Rear angle of Ultegra Rear Derailluer Pulleys - whats with the gap in the plates?

Given the tight timing to the Unfondo ride, I did not have much time to get a replacement when I decided it was indeed the lower pulley position. It turns out Diamond Dave had a little Dura Ace 11sp sitting around and was able to let it go for a good price and perfect just-in-timing.


The cable here is always a trick,


provided a good starting point accept I went and upshifted the lever with the old cable already removed.
How to get it back? After poking and failing, I found the shift lever hood rubber blocking the motion of the tension release. Another annoyance is the cable covering/routing in the Ridley, its a light plastic that got knotted on itself, requiring me to cut n splice. 

The result is smooth, clean dura-ace shifting! Some tension adjustment is ongoing as the new cable settles.

Dura-Ace 9100 Short Cage Baby!


Post Ride

The biggest issue on the ride was an increasing "creaking" noise - initially it was just under power, echoing through the carbon rim and disturbing neighbors in the paceline, until the end of the 75 mile ride where it was driving us all nuts all the time. In the last 5 miles, and after a quick attempt to adjust the derailleur tension one last time, I realized it was THE BEARINGS. Duh. The wheel did seem tight
vs other times I went to fix the bearings.

Steps

  1. tube n tire off
  2. remove disc rotor
  3. remove gear cassette
  4. remove axle ends
  5. remove cassette carrier
  6. tap out axle and non-drive bearing
  7. tap out drive-side bearing with a 19mm socket
  8. grease and place new bearings in place
  9. 21mm tap and hammer to drive side, 19 mm tap to non-drive side
  10. oil up the carrier end and MAKE SURE THE SEAL IS IN RIGHT
  11. replace axle ends
  12. locktite on bolts and re-install the disk
  13. install the cassette on the carrier, tighten lock ring tight
  14. tube, tire with starch as a baby powder replacement
  15. air, quick release axle and lever
  16. install wheel, test and tune

Cleaning of the Cassette

After removal from the D712SB hub, its time to clean the cassette Another t-shirt, some degreaser and elbow grease, its nice and clean. Not shiny, I think because its only Ultegra.

New Bearings For Rear Wheel

Checking my order history on Ebay and in my email, I buy a lot of bearings, last time in Jan 2021. So I checked the shed Hubs bin and found a pair of fresh bearings awaiting an adventure!


I checked a quick You Tube to make sure a hammer was indeed needed


and punched the old units out, greased them up and punched them back in - the socket sizes were
a good idea, I used a 21mm socket to get them into the drive side (used a 19mm for the non-drive as prescribed in the video.

Starching of Tubes n Tires

I finally ran out of baby powder, likely better for my health anyway. SO I grabbed some corn starch, nearly as lubricating to the rubber interfaces. I used starch re-installing the rear-tube, and even took off the front tire and tube to starch it up too.

Radio is talking about critical mass - I used to do that. Started Sept 1992, I was 1997.

Back to it.

Quick Test

Worked great, the Coospo computer however was not seeing the speed sensor. Did I knock it? Worked fine for the ride itself, some readjusting and it picked up speed again.


Friday, September 23, 2022

2022-0923 Fall Roundup

 Documenting Updates to the Fleet

  • Intense Shipped the Dropper Replacement!
    • I shipped the bad one back. 
    • I noticed no obvious air port to top off pressure. 
    • No news on what might have been the cause of the end failure yet. 
    • Installed the dropper and took it for a KT ride, worked fine as before.
  • Rockshox 35mm lower kit arrived for maintenance, but I need oil and desire to get dirty
    • Also got a 140mm shaft - I need to inspect and see if/why I am running so little pressure - maybe bent shaft? or dry/not enough oil?
    • IF oil works, return shaft
  • Need to return the Nukeproof XL pads - even the L seem big, very bulky. Okay with the elbows but the knees seem to be too much.
  • Unfondo - got pulled in from the wait list so I am in. Maintenance/tuning on Whitelines continues
    • new Coospoo is working well
    • got a bell!
    • tuned the front derailluer - I was doing it wrong forever apparently, but it still rubs in biggest gear
    • get new tubes and maybe install the GP 5000's on the intended bike?
  • Offering up Old Blue and FM166 to a young rider in need - has me pondering also adding White Lines and even Red Pinarello.
    • Noticing the shift in generations out on the road
    • Feeling old this am, not into the CX at all, even to practice after donuts today
      • Terrible feeling that if I lose riding, I lose my social life.


Sunday, September 4, 2022

2022-0904 Popped the Dropper on Hi-Ho Silver (Intense951 XC)

 I set out to do a lap or 2 of Tamarancho this am before the heat set in. Took the race-configured Intense951 XC, and the new Nukeproof Enduro pads up the hill, thinking how well this bicycle was working - shifting, seatpost and brakes (mostly) have been awesome.

Rear brake under pedaling load and turning left chirped a little, I tried loosening the caliper bolts, then riding a bit and then tightened the result. Helped.

Anyway, sweating it out and keeping the HR under 145, Julian of the KT gang shows up while I hung out atop the Flow Trail. Julian was "going slow" which for him is a strong medium for me - still unable to hang on the downs. Did a lap and Una Mas'd another, when out of the blue past the "bell bridge", my seatpost went "POP" and my butt slammed down to the minimal position. Hmm, so much for the trouble free post. I assumed a chamber literally popped in there, no air,etc. but it seemed to move a bit too much. Struggled on out with lots of standing, and/or sitting low, ate a sandwich and Root Beer with Julian then went home with the broken rig.

Hosed it off, loosened the seat post and got a very long silver post and threaded end


That was unexpected. The whole scene:


I was able to thread it back in, but the cable was bent on the end AND broken at the lever - had not noticed that.

Looking into the tube, how was I supposed to get the cable back into the end?


Unable to find details on internal dropper cable routing for the Intense 951 or snipers, I went to the website and tried "chat". No US listings available but NZ and AU were selectable. So I hit it, and Josh G kindly answered from the AU option (NZ had no response, but maybe closed - 3pm in AU)


Josh's description of how it SHOULD be working gave me confidence that that threaded end had indeed been piston-ing into the seatube and warping the cable housing into a coil - from the phone and bike flashlights it looked hot-glue-gunned in place.

So a sharp hook on a clothes hanger and a little fishing I hooked the coil, pulled the cable straight, and was then able to pull out the housing as Josh promised. Hurray!


I need to buy an over-length housing and cut to fit. IF the seatpost works, no harm no foul. I did find some nice seatpost manuals with greasing and assembly instructions that might get put to use.


(458 miles on Hi Ho Silver according to the Strava Gear report)


Wednesday, August 24, 2022

2022-0824 Maintenance Log - new computer, new derailluer

 Received the $40 "Coospo" GPS/Ant+ Cycling computer, learned to program it, synced up Wahoo TickR HR and Garmin Cadence/Speed Ant sensor. Seems fine so far, BUT most notable observation is the device is physically HUGE, like 4x the size of a Garmin 500. Hilarious. Readablity looks good, I hope the backlight will turn itself off in the dark.


Task 2 was installation of a new Shimano 12speed MT8100? rear derailleur. I was bummed that the device looks exactly like the one its replacing, I hope the internals are improved. New casing and cable too, of course.


Shimano XT RD-M8100 M8120 SGS 12 Speed Rear Derailleur Long Cage


Thursday, August 18, 2022

2022-0818 Maintenance Log

 Santa Creme

- chain wipe n lube, cassette wipe

- pike air pressure - 60 psi, try to equalize lower chamber pressure, 20% sag, rebound +3 turtle, high speed 7 clicks(center)

- tighten/re-tension dropper post cable

- silicon spray dropper shaft

- hand pressure check tires/seem fine

- remove inspect and sand down rear pads (were noisy), wipe rotor with fresh rag. Assemble and test outdoors, edge of skid

Saturday, May 21, 2022

Headset Spacer Swap another -80g

 Not sure if this one was worth it, bit swapped a stack of aluminum spacers for some bigger carbon options in 2 pieces.

213g stack of Aluminum rings


134g 2 piece carbon spacers

Good ride at China Camp, I took Santa Creme with the WTB i27s from HiHo, now tubeless. I also put an Old minion on the front.

Rode okay, did notice the weight of the rear. First half was crap riding on my part, second part I clicked in. Shortish ride looking at the stats, used flats. Not sure if too much racin or not enough trailing.

Going to get spacers to put the big Light Bicycle rims back on the SC. Leaves me a spare front intense not fitting the 100mm pike. Never shoulda sold the spare fox 34 boost…